Some baseball hats have adjustable straps at the back of the cap. However, the other type, the fitted style, does not have these adjustments available.
The fitted caps are much more stylish but may not fit everyone. Fortunately, this article will tell you how to shrink a fitted baseball hat.
Contents
Steps to Shrink a Fitted Baseball Hat
Baseball caps sure are trendy. So if you buy one out of impulse and get a fitted hat too big for your size, use the steps here to make the fit better.
It is easy to tighten a fitted hat by following the wet-heat-dry method.
To make a baseball hat fit better, you need to find a way to shrink the materials of the cap, usually polyester or cotton. Then, you will maximize the ability of these materials to shrink when heat is applied to them.
Plus, as the cap dries, you need to have a smaller mold ready for the baseball hat to adapt to. Let us dive deeper into the things required and what to do for each step:
What to prepare
- Spray bottle with clean water
- A source of heat for the hat (you can choose one of the following)
Hairdryer
Pot and stove
Warm water
- Kitchen tongs (optional)
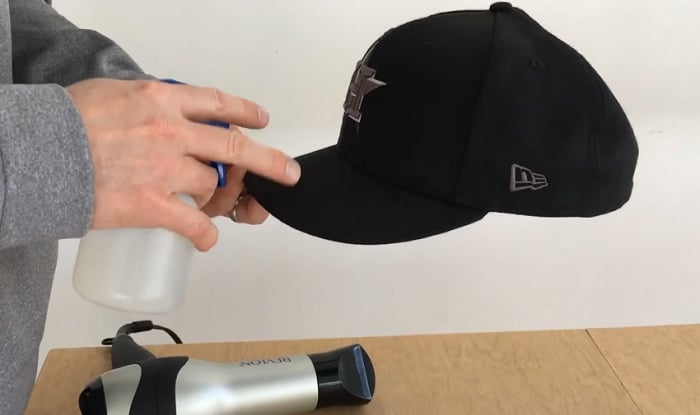
Step 1. Wetting the baseball cap
Before getting to the tightening process, you must prep the hat first.
Start by spritzing all around the cap, except the bill.
Do not forget to spray inside the cap so that all parts that should tighten are evenly moist with cold water.
However, remember that you do not need to soak the baseball hat in the cold water.
Similarly, to shrink New Era hat, you only need it to be damp but not dripping wet.
Also, here is the guide to cleaning a baseball cap correctly if you needed.
Step 2: Apply heat to shrink the hat
- Option 1: Use the hairdryer
You should now set the hair dryer on high to shrink a fitted hat polyester or cotton.
For this step, I suggest using a ball smaller than your head, a ceramic bowl (be careful not to break this one), or even your fist.
With this, the cap will tighten closer to the mold you have inside.
Dry the hat all around. Then, turn the cap inside out and repeat the process to ensure that water is dried out from the inside and outside of the cap.
- Option 2: use a pot and a stove
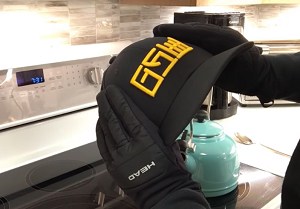
You can shrink a cotton baseball cap by steaming it over a boiling pot of water.
Prepare water to boil; once steam is rolling from it, hover your moist baseball cap over it.
You can use kitchen tongs to help position the cap over the steam without burning your hand.
Do this intermittently for half a minute over the steam and half a minute rest. Repeat at least five times.
- Option 3: use hot water
For this option, you need to dip your hat (avoid dipping the bill!) into warm water.
Just use a pair of kitchen tongs to make sure you are safe when doing this step.
Dip and soak the cap for less than ten minutes in a pot with warm water. Then, scoop the hat out of the warm water and proceed to the next step.
Heat will be generously applied on the cap, except for the bill.
Avoid dealing too much heat damage to the bill because it may weaken the bill’s support.
You would not want a wonky-shaped baseball cap bill after you make the fitted hat on head.
Step 3. Drying the hat

Whether you have chosen options 1, 2, or 3 as your method to shrink a baseball cap yourself, you should not skip step 3.
Drying the hat means that you are now witnessing the fibers shrink. And you want it to shrink to your desired size.
- Once the hat reaches a tolerable temperature, you can try wearing it over your head like normal.
Let it dry thoroughly while wearing so that the cap will follow the shape of your head.
- Alternatively, you can just wear the hat for an hour or so.
Then, hang the cap by its bill to fully dry it. This is recommended if you are uncomfortable wearing a moist baseball cap as it dries!
Step 4. Assess the cap’s adjustment
Once the cap is fully dry, it is time to take a step back and assess what happened as you went through the process.
Wear the cap-like normal. See if it changed in size and if you are satisfied with it.
From here, you can assess whether it is already acceptable or if it needs further modification.
You can tighten the cap again by re-doing the process. I would also suggest trying a different heating option if you are not satisfied with the fit of your shrunken hat.
Helpful Tips to Make a Fitted Hat Smaller
You may get confused about what you are doing to make your baseball cap more fitted, so read these helpful tips:
- If you want a quick and easy way, you can use a washing machine and dryer. All you need to do is give your baseball cap a hot water cycle in the washing machine and toss it in the dryer set at the highest temperature.
- A common method you can see floating around the internet is shrinking a cap in the oven. This is not mentioned here in this article because of too many risks. It is a fire hazard; you can burn yourself or even melt the fabric!
- Heat is used in all instances here. So, you need to arm yourself well with heat protection! I mentioned kitchen tongs here, but you can get creative and use what you have.
Conclusion
Fitted hats are a timeless classic. Plus, it suits many outfits and is perfect for casual or sporty attire. But, unfortunately, having a loose baseball cap is such a let-down.
If you find one you like but are unsure if it fits you, there are several ways on how to shrink a fitted baseball hat.
We have here the wet-heat-dry method with all sorts of options. The general principle is that you use heat to expand the fibers of the hat. Then, as it cools, it will follow the shape of what it dries onto.

A powerful swing and the ball is flying across the field, just one hit, and we might never forget the thrill it brings. I do not know about you, but I never do. Every baseball game is the chance to compete with others and cooperate with your teammate. It is among my biggest passions.