What is that one thing you cannot play baseball without? Aside from the gloves, you also need a baseball bat!
If you want a DIY baseball bat, then this article will provide you with an easy-to-follow guide on how to make a wooden baseball bat.
Based on the MLB rules, a baseball bat needs to have specific dimensions, but you have the liberty to choose different kinds of wood to your liking.
Making your bat needs a bit of elbow grease, but surely, the end product will be worth it!
Contents
- Step-by-step Guide for Making a Baseball Bat at Home
- What to prepare
- Step 1: Obtain your wood blank
- Step 2 Set up and find the center of the wood blank.
- Step 3: Measure the wood blank and mark it
- Step 4: Turn on your lathe to initiate the cutting process.
- Step 5: Use carving tools and follow the guide on the wood blank to produce the ideal bat diameter.
- Step 6: Carve the knob and gripper.
- Step 7: Measure the length of the bat.
- Step 8: Start the finishing process by sanding the bat.
- Step 9: Apply two generous coats of wood varnish.
- Step 10: Remove your baseball bat from the lathe.
- Step 11: Complete the finishing of the bat.
- Helpful Tips
- Conclusion
Step-by-step Guide for Making a Baseball Bat at Home
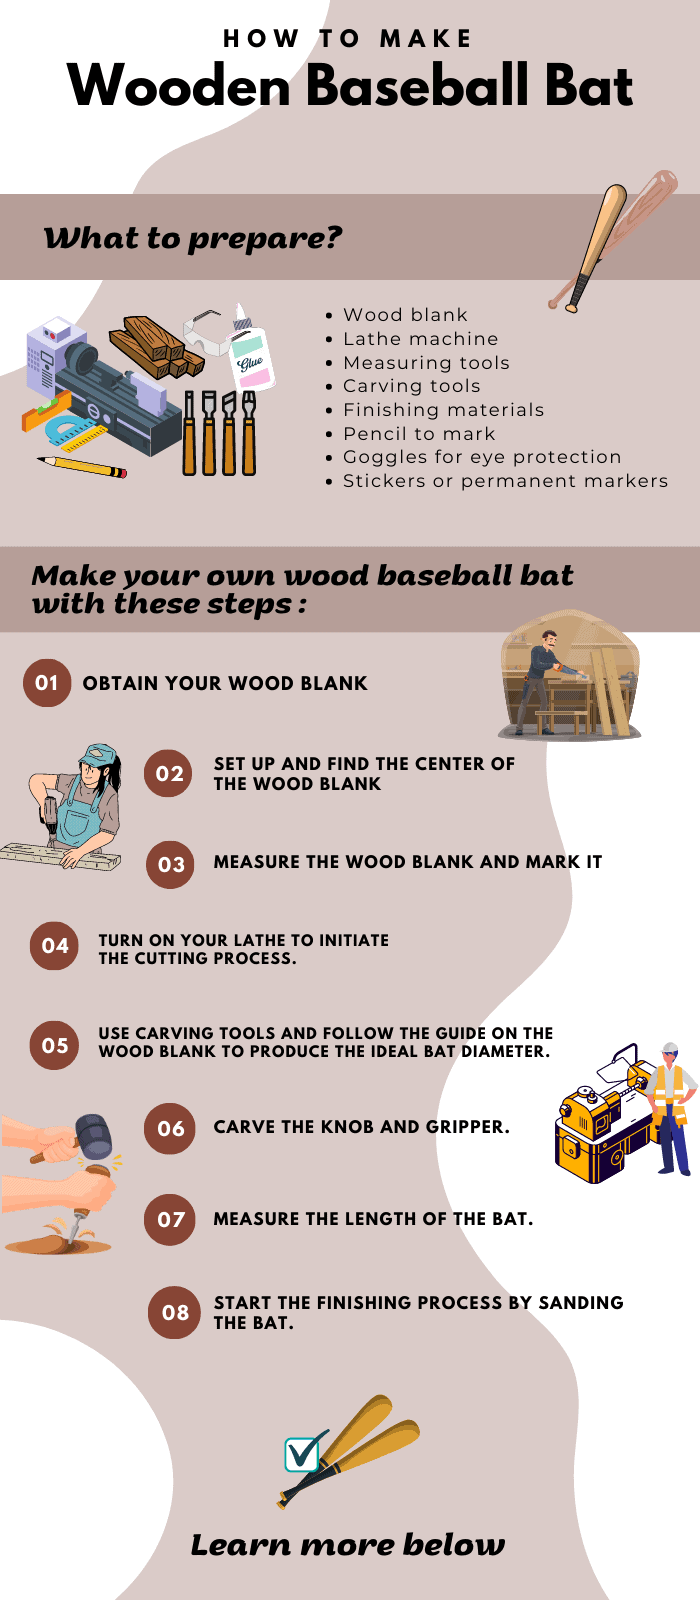
What to prepare
- Wood blank. You can obtain one from a local workshop or wood store. Make sure it is at least 36 inches to make the bat appropriately.
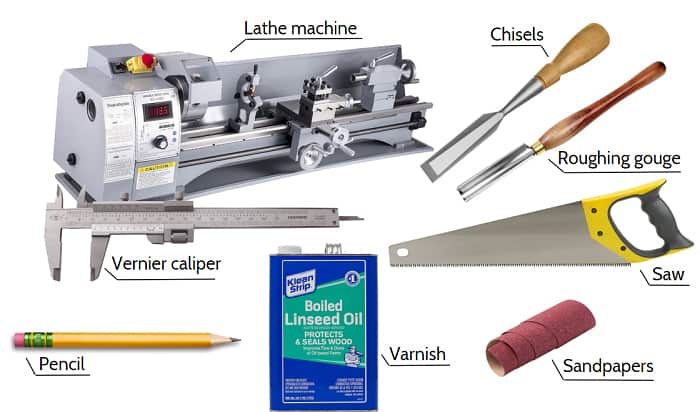
- Lathe machine. The late machine is usually available at bat workshops. Depending on the quality and brand, this machine can cost between $500 to $2000.
- Measuring tools. Prepare tools like a spring caliper, vernier caliper, and measuring tape.
- Carving tools. You need a saw, chisels, and roughing gouge.
- Finishing materials. Prepare sandpapers, wax, oil, or varnish.
- Pencil to mark the measurements onto the wood.
- Goggles for eye protection
- Stickers or permanent markers for customization
Professional baseball bat manufacturing firms use large tools that carefully carve wood planks to produce the baseball bats that players use.
However, this does not mean people cannot make a homemade baseball bat. Indeed, it would need a bit of skill, patience, and manual dexterity to make one by hand.
Make your own wood baseball bat with these steps:
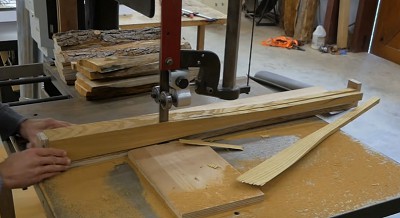
Step 1: Obtain your wood blank
To make your bat, you must have top-grade wood to work with. The wood used for baseball bats usually varies, but maple wood is the most commonly used.
Since the entire process of making a baseball bat is essentially trimming it down, it is safe to use a wood blank which is 3 inches by 3 inches by 36 inches. Also, ensure that this wood is completely dry for ease of carving.
Step 2 Set up and find the center of the wood blank.
Begin by marking the center of your log. Use measuring tools and find the center by dividing the length, width, and height in two.
Use a pencil to mark a cross with these points. This will be your guide when later setting up the wood onto the lathe.
Step 3: Measure the wood blank and mark it
Next, prepare the wood by marking the appropriate dimensions. Typically, a bat has a diameter of at least 2.5 inches. You can use the minimum diameter if you want a lighter bat which is easier to swing.
Use your pencil to mark increments of four inches. This is where the baseball bat dimensions lathe to a shift in diameter.
Step 4: Turn on your lathe to initiate the cutting process.
Making a homemade bat is more efficient with a lathe. Place your wood blank on the machine by centering it using the prior measurement guide.
Turn on the lathe machine to around 1000 to 1500 rpm. Touch the roughing gauge softly onto the rotating wood. Begin by marking the four-inch marks to guide you in carving the curvatures of the bat.
When using the lathe, take extra safety measures. Always wear protective eye gear since you would not want to damage your eyes with the wood shavings.
Furthermore, avoid forcing the carving tools. The rotation of the wood on the lathe will exert most of the effort in cutting.
Step 5: Use carving tools and follow the guide on the wood blank to produce the ideal bat diameter.
From here, you can carve the bat’s ideal form. You can begin with the barrel’s widest part and work your way to the narrower diameters.
You can go back and forth with re-measuring your wood blank to ensure that you are still following the correct dimensions.
After the barrel, continue cutting larger chunks of wood to produce the taper. This one can take a bit of skill to avoid over-trimming. Remember, once you cut off a piece, there is no way to put it back!
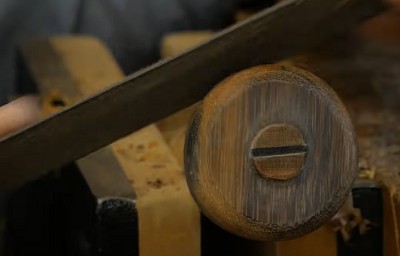
Step 6: Carve the knob and gripper.
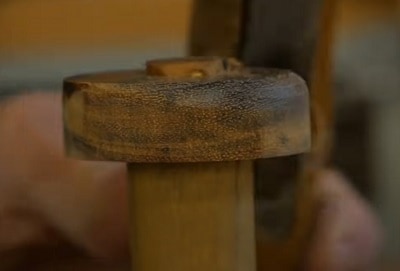
It would be best to keep the trickiest part to cut for last. In this case, the knob and gripper are the hardest to do.
To get that perfect shape, you can lower the speed of your lathe down to 500 to 600 rpm.
Step 7: Measure the length of the bat.
After cutting the form of your homemade bat, measure the length you need. The standard length of a baseball bat is 32 inches. Use your measuring tape for this step, and mark the ideal ends with a pencil.
Also, re-check the measurements of your bat’s diameters with a vernier caliper. You can go back to cutting as needed. A balanced bat is perfect for good hits.
Related: Youth Baseball Bat Sizing Chart & How to Effectively Use It
Step 8: Start the finishing process by sanding the bat.
Initiate the finishing process with sandpaper while the wood is still in the lathe. Utilize the rotation of the machine to make sanding easier.
Remove the gross roughness with coarse sandpaper. Then, switch to a finer sandpaper to produce a sleeker and smoother surface.
Step 9: Apply two generous coats of wood varnish.
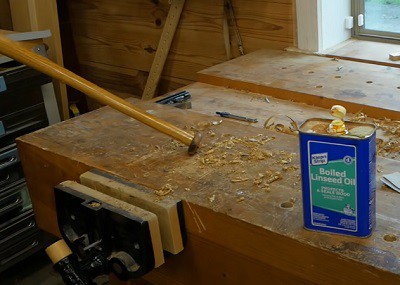
A baseball bat is made to last a long time with a player on the field. To prolong the lifespan of your beautifully created bat, apply two coats of varnish.
Use a cloth generously dipped in wood stain and rub it all over the bat. Dry the first later before repeating the same step for the second coat.
Buff wax like a Min-Wax pastes onto the bat to further give it a shine. Turn the lathe on while buffing this wax. A lacquer finish is optional to prolong the varnish stain.
Step 10: Remove your baseball bat from the lathe.
Once you are satisfied with the smoothness and shine of the bat, remove it from the lathe.
Step 11: Complete the finishing of the bat.
Saw the untrimmed ends of the baseball bat and repeat the same sanding and finishing procedures on the trimmed edges.
Take one last look at the bat and buff or polish as needed.
You can also customize your own baseball bat with stickers or permanent markers if you want.
Helpful Tips
What is the best wood to make a baseball bat out of?
The MLB wooden bat is traditionally made with Ashwood. However, the more common wood type now for bats is maple wood.
In many baseball games, Maple wood offers decent strength and durability to withstand swings and hits. Furthermore, maple wood creates better bat shapes and an overall balanced product.
Other materials to make a baseball bat with?
Other woods used in bats are hickory, bamboo, and birchwood. Hickory is a bit on the heavier side, making it less of an option. On the other hand, bamboo is lighter but lost its popularity with maple wood which is more durable.
Aside from wooden bats, manufacturers also make a composite bat. This is made with more reinforced material like carbon polymer.
For kids, you can make a baseball bat out of cardboard just for them to have fun. However, if you make a baseball bat out of paper, these will not be as durable and are generally not accepted in training and games.
Conclusion
You would surely need to have a bat with you when you play. If buying is not an option, opt to learn how to make a wooden baseball bat instead. This is a process that needs quite a lot of materials and effort. Plus, working without a lathe is more complicated as this makes the cutting process more efficient.
Choosing handmade baseball bats allows you to make your own baseball bat.This personal touch can make your bat more tuned to individual needs, like the choice of wood and the lightness of the bat.
With these steps, you can begin making your own bat today!

A powerful swing and the ball is flying across the field, just one hit, and we might never forget the thrill it brings. I do not know about you, but I never do. Every baseball game is the chance to compete with others and cooperate with your teammate. It is among my biggest passions.