It is a common understanding that drawing a baseball cap is a simple task. However, not everyone can do it, especially the kids. Because of that, certain people are left to wonder whether or not drawing a baseball cap is as easy as it seems.
The truth is that drawing a baseball cap can be difficult without the proper techniques. Now, if you want to learn tricks to the trade, you might begin by underestimating the task. The rest should then follow.
For now, read this article to learn how to draw a baseball cap.

What You Will Need
1. Black Pen or Marker
The ultimate tool to draw a baseball hat on a person or cartoon character is the black pen or marker. While some people want other colors besides black to outline shapes, the standard color remains black.
Although there is no written rule on this, black’s color exudes a certain kind of boldness, visibility, and sheen. And that perhaps explains why classic artists use black pens.
Picking the right pen quality should be another primary consideration. Fine and chisel-tipped pens would be an excellent option for beginning artists.
2. Coloring Materials
The coloring materials add depth to the baseball cap drawing. Having a wide selection of colors allows the artist to customize the cap based on their desired style.
Coloring pens quickly come as the best option for this. Crayolas are also great, but they don’t last longer than the coloring pen since they melt (being that they are made of wax) under intense heat.
When choosing coloring pens, go for those that don’t smear or bleed on paper surfaces. Finally, opt for quick-dry products for neat outputs.
3. Blank Paper
Yes- even a seemingly innocuous tool like paper contributes so much to the quality of your drawing. Consequently, not all papers are created equal. Not all papers share the same grade; this difference in grading speaks a lot about its propensity for causing either excellent or bad drawings.
Each paper distinguishes itself from the rest in conservation, weight, and tooth. You probably have not heard of these criteria, but they exist. Professional artists are actually of these.
Looking into the paper’s weight does not mean weighing a paper. The weight refers to the total poundage of the rim. When choosing your paper product, go for the heavier one. It would mean that each paper has a bigger mass and higher durability to support contacts on baseball hat drawings.
A 30-90 poundage range (indicated in the package) proves to be the best option for your reference.
An acid-free material ensures the paper’s conservation. This trait should maintain the superiority of your drawing for the longest time possible.
Finally, the paper’s tooth refers to its surface texture on contact- smooth or heavy. Choosing either tooth type tends to question how the pen is being used. Pick the for-pen or pencil paper if you use a pen to draw because it has a smoother tooth.
On the other hand, choose the for-charcoal or pastel paper package for thicker or heavier contact.
4. Protractor
The protractor, intended for measuring plane angles, is an excellent tool for guiding you in shaping hemispheres or semi-circle shapes. In addition, it provides accurate turns on angles, lengths, and positions.
Drawing a baseball cap starts with shaping a hemisphere or a semi-circle. Thus, the protractor’s disk shape should come as a great help for shaping an error-free, clean and accurate outline.
If you don’t feel like using a protractor, do get any alternative disks to do the job instead. It doesn’t matter.
Steps to Draw a Baseball Cap
Here are the simple steps on how to draw from a hat:
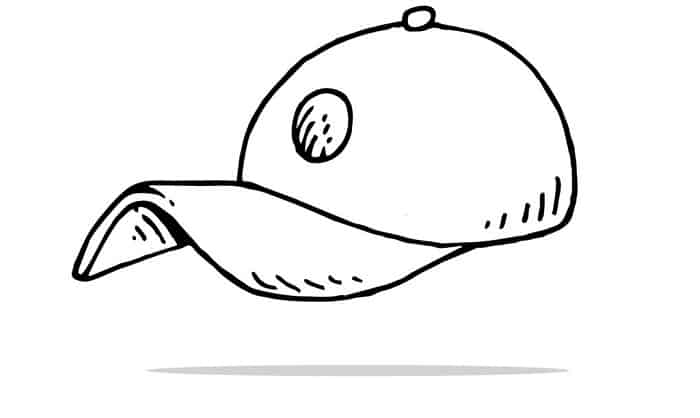
Step 1: Begin with a hemisphere.
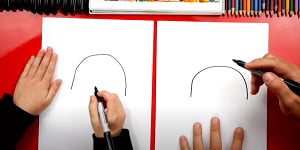
Use your protractor to draw the main shape- a hemisphere. Once done, erase the top or crown outline of the hat to flatten it a bit, as it should not be a perfect curve. Finish off the shape with the bottom part of the baseball cap. Finally, curve the bottom part slightly.
Step 2: Add half of an oval (for the visor).
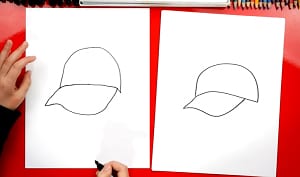
Draw the half of an oval (almost flat) that is a bit wavy. This protrusion shall serve as the visor fronting the crown. You can do this with your touch or style. But make sure to keep the half oval smaller than the hemisphere you first drew. You can dramatize the wave of the visor by showing its underside.
Step 3: Add in the sections.
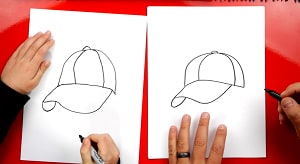
Divide the crown space using 3-4 curved lines extending from the top to the base. Do not go beyond four lines to avoid crowding the crown’s space. Keep in mind that the lesser the sections, the better the visuals.
Note also that you will be drawing the stitches of the baseball hat in these lines. So keep it sparse.
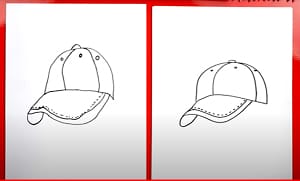
The baseball cap drawings would not be complete without the button on top of the cap and the stitches along the sections. These features should keep your picture very close to the image of an actual hat.
But not that the stitching is not a hard-pass rule. In the end, it is all up to you. Even the thickness and amount of stitches will be up to you.
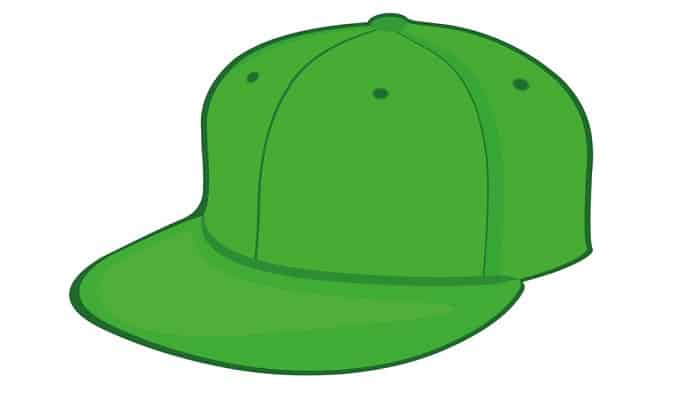
Step 5: Color your baseball cap.

Coloring your baseball cap drawing is again an optional move. However, the colors undeniably provide a fantastic finishing touch to your baseball cap drawing. Now, if you decide to color your picture, maintain a one-stroke motion when doing it to keep it neat.
Do not just apply any color to your cap. Use real baseball cap pictures to reference how you want your baseball cap color to appear.
However, if you want to stylize or customize your color, then do it. Just be aware that you might not strictly end up with a baseball cap.
Just look at how it is done here.
Conclusion
If there is one main takeaway from the steps on how to draw a baseball cap, it is undeniably a fun thing to do. Drawing is perhaps one of the best activities to self-express.
Meanwhile, if you plan to come up with a perfect drawing, you would better consider some preparations before laying down the pen on your paper.
Good luck!
Read more: Tips to clean a baseball cap.

A powerful swing and the ball is flying across the field, just one hit, and we might never forget the thrill it brings. I do not know about you, but I never do. Every baseball game is the chance to compete with others and cooperate with your teammate. It is among my biggest passions.